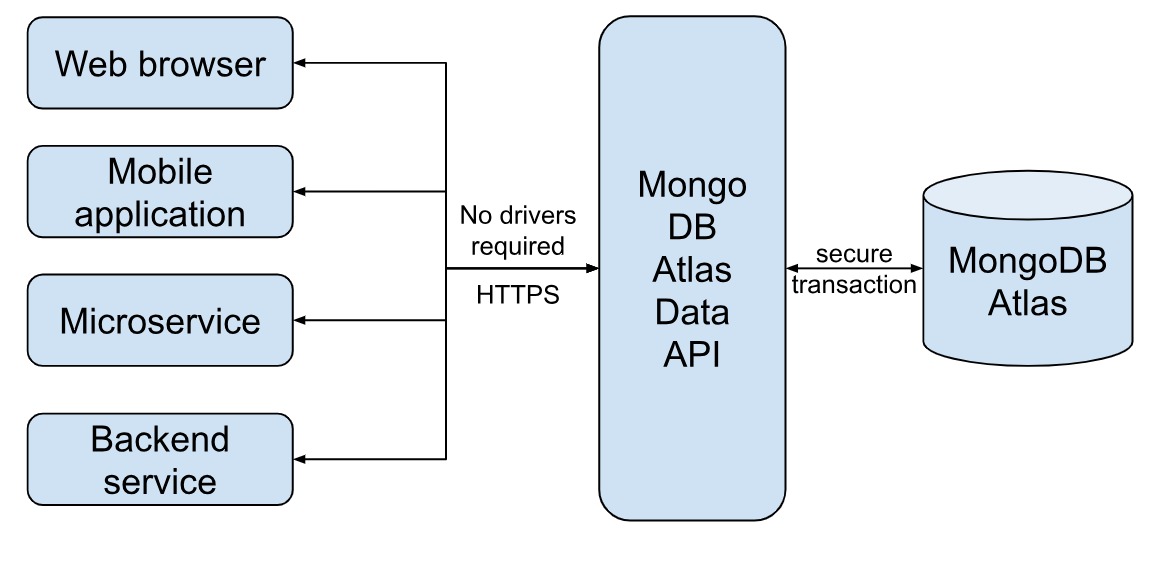
Generally, we connect our applications to the database using a language specific driver, which is the ideal way to connect to the database. However, in cases where you can’t or don’t want to use a driver (if the driver is not available, or not supported on the server-side environment), MongoDB provides a convenient data API to make the task easier for the developers.
With the Atlas Data API, you can perform the standard CRUD (Create, Read, Update, Delete) operations, as well as the aggregations.
Do not mistake the Data API to be a direct connection between your application and the database, it is a fully-managed middleware that lets your applications access the database cluster.
Data API can be used with any platform that supports HTTPS, like web browsers, mobile applications, IoT devices, and you do not have to download libraries or drivers for the same. You can simply request/send data as an HTTPS request.
Why MongoDB Data API
When you have a full-fledged large-scale application that needs a lot of functionalities, tools, integrations, drivers and customization, you probably would go ahead with a standard API layer. However, if you want to build a quick application with limited and simple functionalities, all the above additions could be an overkill. This is where the out-of-the-box data API helps.
MongoDB Atlas Data API is a serverless, REST-like API that gives you a simple way to integrate microservices, or test your application before you build a full-fledged standard API layer.

How does Data API work?
For each HTTPS request, the data API adds an additional layer of authorization, authentication and access check to ensure the safe transaction of data. For example, each request consists of an endpoint url, which contains the url for connection and the action (database operation) to be performed. Along with this goes the data, which contains the database name, collection name, and other necessary parameters to complete the operation. For example, for an insert operation, the document to be inserted. Apart from this, an authorization header is sent, containing the details of the user in the form of an access token.If there is no authorization header, the application will look for an api key or custom credentials set for the user.

The data API uses the same JSON syntax, which is used for normal database queries. The operations that you perform are the same as the MongoDB database query operations, like find(), findOne(), insert(), insertOne() and so on. The difference is that you can access them through simple HTTPS requests - POST, as GET tends to be cached sometimes (while reading data), so MongoDB API endpoints use only POST.
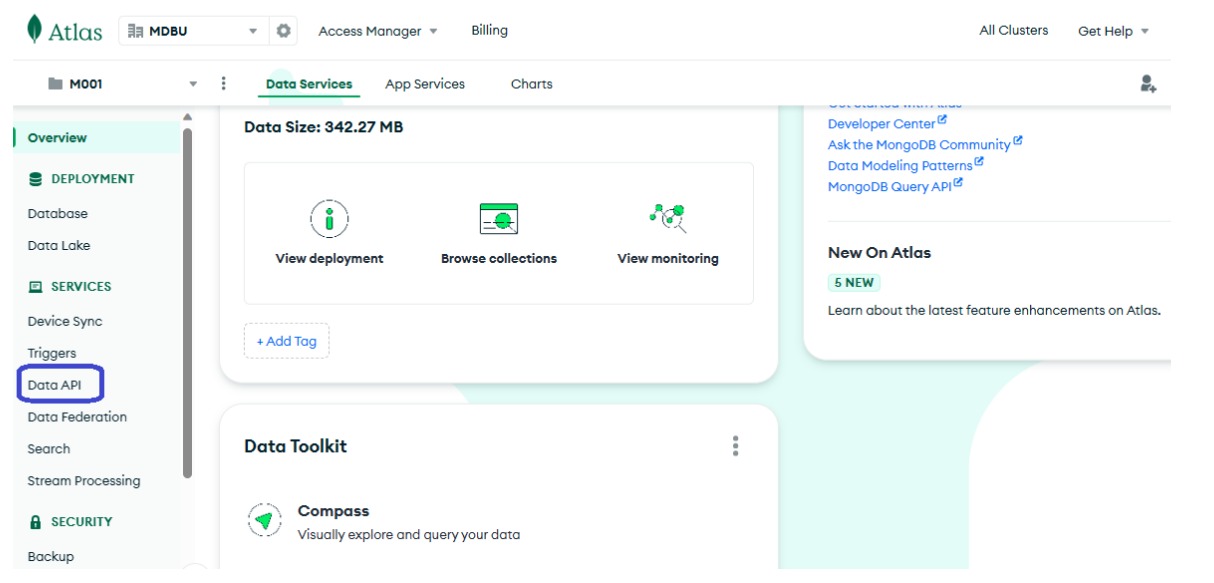
To use the Data API, you should enable it using the MongoDB Atlas UI. Once you login to your cluster, you can see the Data API in the left menu options:

Next, select the data sources you want to enable the API for and click on the ‘Enable data access from the Data API’ button:

That’s all you need to be able to set it up.
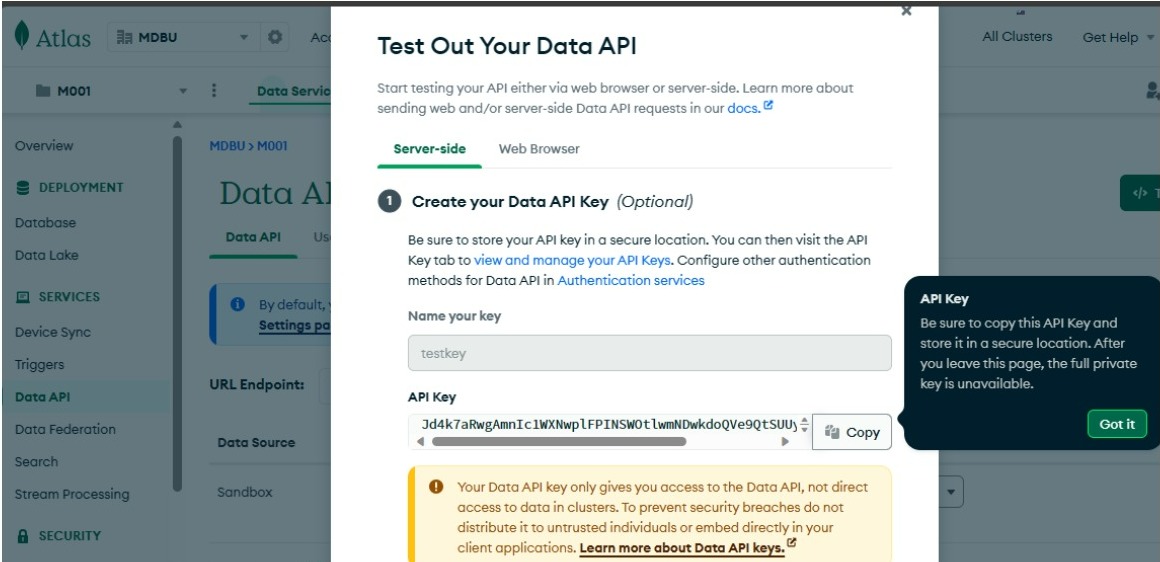
To use the API on the server-side (not from a web browser), and to test it by firing CRUD or aggregation operations on it, you need an API key, which must be kept safe at all times. MongoDB will generate the key once and you must copy it at that time. Remember that whoever has access to the key, can alter the database!

You can run the queries using cURL or Postman. Here is a sample query generated when you create the API key:
curl --location --request POST 'https://ap-south-1.aws.data.mongodb-api.com/app/data-pxqrz/endpoint/data/v1/action/<action>' \
--header 'Content-Type: application/json' \
--header 'Access-Control-Request-Headers: *' \
--header 'api-key: add-your-api-key-here' \
--data-raw '{
    "collection":"<collection _name>",
    "database":"<database _name>",
    "dataSource":"Sandbox",
    "projection": {"_id": 1}
}'
</database></collection></action>
Note that in case of an aggregation operation, you would use base_url/aggregate in the endpoint url and ‘pipeline’ in the data body.
If you want to use a web browser, you need not worry about the API key. You can create a username and password for authentication:

You can then send an HTTPS POST request to the authentication endpoint with the user credentials to get an access token:
curl -X POST 'https://realm.mongodb.com/api/client/v2.0/app/data-pxqrz/auth/providers/local-userpass/login' --header 'Content-Type: application/json' --data-raw '{
 "username": "<user _email>",
 "password": "</user><user _password>"
}'
</user>
This access token can then be passed as a header in the HTTPS POST (similar to how we have passed the api-key previously), along with the request:
--header 'Authorization: Bearer<ACCESS_TOKEN>' \You can also set custom access controls and test your API from the Atlas Data API page:
API endpoints
To perform the desired ACTION, like find(), insert() and others, you need to send the action using API endpoint url. MongoDB supports two type of endpoints:
Data API endpoints: The above example we saw is an example of the Data API endpoints. It is automatically generated and can be used for the standard CRUD and aggregation operations.
Custom endpoints: To define specific operations, you can write Atlas functions and create custom endpoints for these app-specific operations.
Conclusion
Using Data API renders the results slowly, and drivers are much faster. However, for the reasons discussed in the article, you can make use of the MongoDB Data API. You can also extend the MongoDB Data API with a whole lot of features like field-level access control, API key, email authorization, logs and metrics, custom functions and endpoints, and built-in JSON schema. To learn more about the Data API, check out the official MongoDB documentation page.


